FSHost
Help
(also take a look at the FAQ page for answers to specific questions)
Help Topics:
Getting Started
Download and run the program
The first thing to do is to download the program and extract the zip
file to a directory. Please see the Download
page for links.
When you first run the program, you'll see the main window, and the game
servers will start automatically. You'll also see text that looks like this,
in the log window at the bottom:
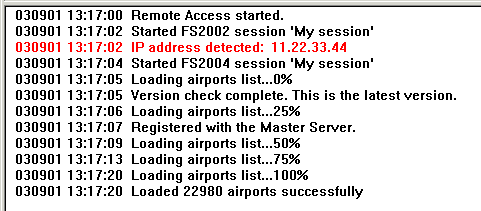
Notice the line in red, above. This shows your current IP
address (11.22.33.44 -- yours will of course be different). This is the
IP address people will use in Flight Simulator to connect to your server.
Configure your network
If you're using a router on your network, or
you have a firewall enabled (including the one built into Windows), you'll need
to configure your PC to allow incoming data from the internet. Otherwise you'll
have problems with people getting disconnected from the session or not being
able to connect. See the topic Firewalls, Routers, and Port
Forwarding for more info. Also note that anyone connecting to your session
will need to configure their router and firewall the same way.
Someone else connecting to your FSHost
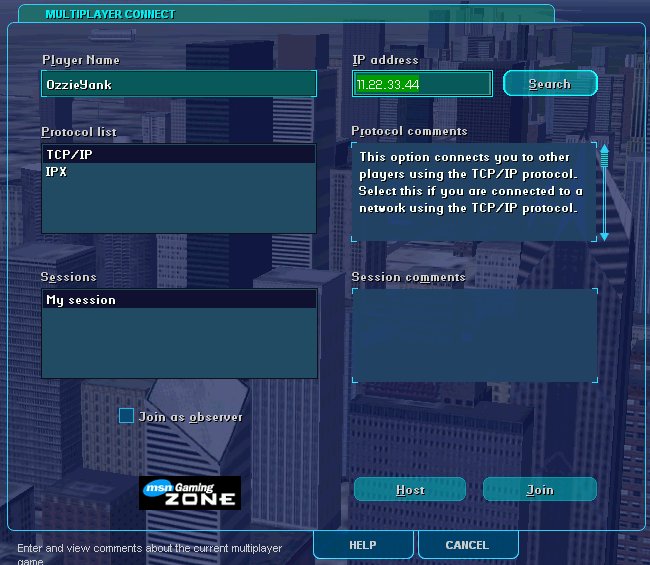
When someone connects to your server, here's how they do
it. First they start the game themselves. Then they click on "Multiplayer"
and then "Open multiplayer session" (or Flights / Multiplayer / Connect,
if they're already in the plane). They should see a window like the
one below. First they should type in a player name. Then they
should type in your IP address (from the log window above), and click Search.
After a second or two, they should see your session come up in the "Sessions"
box. Then they can click "Join" and it'll connect to your FSHost.
The screenshot below is from FS2002, but it's very similar in FS2004.
Note that players using Flight Simulator X (FSX) will need
my FSHostClient program to be able to connect to an FSHost server.
You can download it for free from the FSHostClient
page. That page also explains how to install it and how to connect
to an FSHost server. FSHostClient is only for people running FSX that
want to connect to an FSHost server. FS2002 and FS2004 users don't
need it, although players from all three games will still be able to fly
together and see each other in the game.
Playing in your own game
If you want to fly in the game as well as host it, you just
connect your game to FSHost like everyone else does. When you connect your
game to your own FSHost, you do it exactly the same way. The only
difference is that you can leave the IP address box blank, and just click
Search. This is because both the game and FSHost are on the same machine.
(Note that you don't click the Host button in your game -- that's what FSHost
is for)
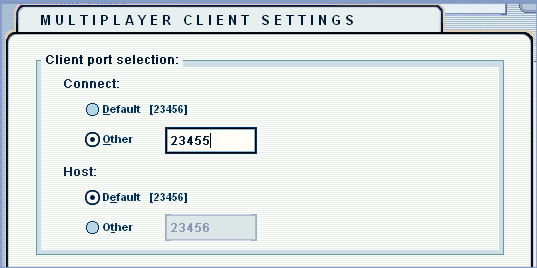
NOTE for FS2004 and FSX: When connecting FS2004
or FSHostClient (for FSX) to FSHost on the same machine, you need to configure
FS2004 or FSHostClient to use a different port from what FSHost is using
for the "2004 Host Port" (on the Options / Session window). By default,
FSHost, FS2004, and FSHostClient all use port 23456. It's best to
change your own FS2004 or FSHostClient to use a different port such
as 23455, and leave FSHost on the default port. This way other people
connecting to your session will still be able to find your game. To
change the Connect port in FS2004, click "Multiplayer" on the FS2004 startup
screen, then click "Open Multiplayer Session", then on the screen where
you type in the IP address, click "Client Settings", and set the "Connect"
port to be 23455. Then click OK, and you should be able to click Search
again and find your own session.
Note that this is only for your own FS2004 or FSHostClient.
Other players should use the same port your FSHost uses.
The player list
After players have connected to your FSHost, try right-clicking
on a player's name to see the player features. Or select a player in the
list, and then use the Player menu.
The player list shows each player's latency time*, game,
name, type (Pilot, Observer, FSNavigator, or Unknown), aircraft name, connect
time (in days, hours, and minutes), nearest airport ID, altitude, heading,
ground speed, Hop List position, DirectX version*, and status.
*NOTE for FS2004 and FSHostClient: The latency
time and DirectX version are currently only shown for FS2002 players.
These may be available for FS2004 and FSX players in a future version of
FSHost.
The latency time indicates the quality and speed of the
player's connection to the server. Players that are geographically
close to the server, and those that have broadband connections, will often
show up with a green "Good" icon. But even those players may occasionally
show yellow or red when their game is reloading, or doing something else
very CPU-intensive. Players consistently showing red or gray may be
experiencing delays in the game, such as seeing other airplanes jumping
around in the sky, because they're not getting data from the other players
quickly enough. The latency indicator can be one of the following:
The Hop List position is only shown for players that have
started flying entries in a Hop List. The image above shows that OzzieYank
is on hop number 1, flying to airport PHMK. See the
Hop List section for more information.
The DirectX version (shown as "DX") is only reported if
the machine running FSHost has at least DirectX version 9. See
this entry on the FAQ page for more info
about why running DirectX version 9 is so important.
The "status" column can be one of the following:
-
"On ground" -- when player is moving at less than 60
kts and the altitude isn't changing.
-
"Slew/Pause/Rate" -- when player is slewing, paused,
resetting after a crash, jumping to a new airport, changing the time,
or flying at a sim rate higher than 1x.
-
"Flying" -- when not on the ground, and not in "Slew/Pause/Rate"
status.
-
"Not in plane" -- when the player is at the multiplayer
start screen and hasn't created a flight yet.
What's next, after connecting?
If you connected to the server from the Multiplayer start
page, then at this point you'll be back at the same Multiplayer start page
again. First click the "Chat" button to open the Chat window. This is what
you'll use to communicate with the other players (and with the server, via
Chat Commands -- more on that below). You'll always see the "FSHost"
fake player listed in the chat window, and you may also see other players
if you're not the first one to connect. If there are other people in the
game, ask them for a starting airport "ID". This is usually a 3- or 4-letter
code, such as KLAX for Los Angeles.
Then click "Create A Flight" on the left side of the Multiplayer
start page, and setup your flight. You'll probably want to change the airport
to whatever airport ID the other players told you. To do that, click the
"Change" button under "Current Location", and then enter the ID in the "Airport
ID" box. Note that the ID box is the second box, not the first. If you know
the name, you can use the first box instead, but many people find it easier
to refer to airports by ID. After you type in the airport ID, it should
show the name of the airport at the top of the "Search Results" list --
this is how you know you've typed it in correctly. If it doesn't find it,
make sure you don't have a particular region or country specified (you want
it to use all regions and all countries as you type in the airport ID).
If the airport is a large one, it may have gates you can start at. This
is always a good idea to check, because it means you don't have to start
on the runway, where someone might be in the middle of taking off! :-)
In the bottom left of the window, there's a box called "Runway / Starting
Position". Click the arrow next to that box, and see if there are any gates
or ramps you can start at. You may need to scroll down a bit to get past
the runways, which usually look like "25" or "18R", etc.
After you've set the airport id, and possibly a gate or
ramp to start on, click OK, and you'll be back at the Multiplayer start
page. You can also change your aircraft, weather, and date/time. You may
want to be sure that the time is during the day, unless you specifically
want to fly at night. When everything's setup, click "Fly Now!" to go to
the plane. Once there, if there are other planes nearby, you should see
them, with the pilot's name over the top of the plane. If the airport wasn't
big enough to have gates or ramps, then you'll now be sitting on the runway,
and you should attempt to clear it as soon as possible, in case someone's
waiting to take off or land. Once you see who's in the area, you can taxi
back onto the runway and take off.
When you're ready to disconnect from the game, you can either
just close FS, or you can go to the Flights menu and select Multiplayer,
and then Disconnect.
Session Options
When you first started the program, it automatically started
the game server with the default options. You can change all the options by
selecting "Options" from the Server menu, or by clicking the first toolbar button
 ,
or by typing Ctrl-O. This is what it will look like the first time you open
the Options window:
,
or by typing Ctrl-O. This is what it will look like the first time you open
the Options window:
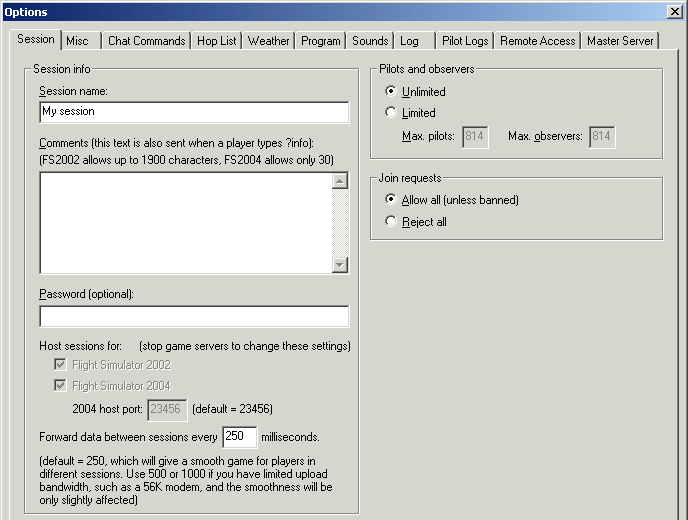
- Session name - The name people will see when they connect to
your session. You can change this to be anything you want, such as
"Free Flight", or "Helicopters over Paraguay", or whatever.
- Comments - Information about your game, such as where players
should start, the type of game, or anything else you want to include.
Note that although FS2002 allows up to 1900 characters, FS2004 only allows
30 :-(
- Password - Set a password here if you want to run a private session.
All players will have to enter this password when connecting.
- Host sessions for - Specify whether you want to run an FS2002
session, an FS2004 session, or both (the default is both).
- 2004 host port - In most cases you can leave this set to the
default port, which is 23456. Most users will not have to change anything
in their FS2004 to be able to connect. If however, you want to run
more than one copy of FSHost on the same machine, each copy must use a different
2004 host port. Suggested values for the other copies of FSHost are
23457, 23458, 23459, etc. Please see the section
Running Multiple Copies of FSHost for more info.
- Forward data between sessions - Normally this can be left to
the default value, which is 250 milliseconds. This controls how often
aircraft location data is forwarded between the 2002 and 2004 sessions (so
players in opposite sessions can see each other). If you have limited
upload bandwidth, or are running a very large session, you might consider
increasing this value to 500, 1000, or even higher, to reduce the bandwidth
and processing time required for FSHost to forward the data.
Misc Options
The Misc tab has a lot of different features:
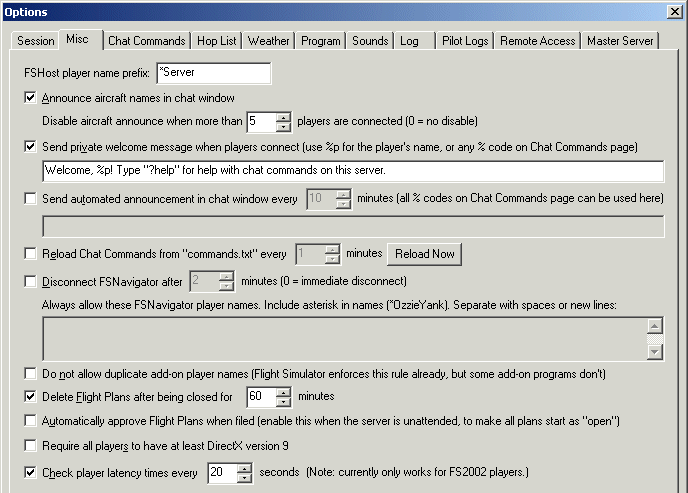
-
FSHost player name prefix - Set the prefix for the
built-in host player name. For example, if you set it to "My Server", then
the host player name will be displayed as "My Server (FSHost 2.5)".
Note that if you change it while a session is running, any players already
in the game won't see the change until they reconnect (a limitation of FS2002).
-
Announce aircraft names in chat window - When a player
changes aircraft, the server sends a chat message to all players announcing
the change. "OzzieYank is flying the Cessna Skyhawk 172SP". Players can
also get a list of what other players are flying by typing the ?planes Chat
Command (see below for more info on Chat Commands).
-
Send private welcome message when players connect
- The server sends a private chat message to players when they first connect.
Usually this message tells about some of the Chat Commands on this server,
and gives some general help.
-
Send automated announcement in chat window - The
server sends a chat message to all players every few minutes, to notify
them of info about the game or your server.
-
Reload Chat Commands from "commands.txt" - Chat Commands
are stored in the file "commands.txt". This file can also be written to
by external programs. If you have a program that writes to this file, you
may want to reload it every once in a while automatically. Otherwise, it's
not necessary to reload the file.
-
Disconnect FSNavigator - When running an ATC (Air
Traffic Control) game, some controllers prefer that players do not connect
their FSNavigator program (http://www.fsnavigator.com)
to the server. Sometimes they prefer not to let FSNavigator connect at all
(set to 0 minutes), and sometimes they will allow players to connect for
a couple of minutes, to download the flight plan. You can also allow only
specific FSNavigator player names. In this case, be sure to include the
asterisk (*) in the name, such as *OzzieYank.
-
Do not allow duplicate add-on player names - Some
add-on programs don't enforce the "unique name" rule, like FS2002 does.
If you're not allowing anyone except yourself to connect FSNavigator to
the server, then you may want to enable this feature to prevent someone
from connecting with the same FSNavigator name as you.
-
Delete Flight Plans after being closed - Enable this
feature if you want to clear old Flight Plans after they've been closed
for a while.
-
Automatically approve Flight Plans when filed - If
you're not running an ATC session, or if you're running an unattended server,
you may want to enable this feature, so that all new Flight Plans are automatically
approved, and start out as "open". See below for more info on Flight Plans.
-
Require all players to have at least DirectX version
9* - DirectX version 8 (which comes with FS2002) has a bug that can
occasionally cause all players in a game to be disconnected all at once.
This bug has been fixed in DirectX version 9 (final release), so all players
are encouraged to upgrade. This feature allows server admins to restrict
a game to only players with a particular version of DirectX, to have a more
stable session. Note however, that the server machine itself must
also be running at least DirectX 9 to use this feature. To check which
version of DirectX you have on your machine, go to the Windows Start button,
select Run, enter "dxdiag", and click OK. That will start the DirectX
Diagnostic Tool, and you'll see your version listed at the bottom of the
first screen. DirectX 9.0 Final Release is displayed as "DirectX 9.0
(4.09.0000.0900)". Any version lower than that will still have the
bug in it. You can upgrade your version of DirectX at:
http://www.microsoft.com/directx/
-
Check player latency times* - Enable this feature
if you want FSHost to send a message to each player every few seconds to
check their connection to the server. See the player list above for
more info on the latency indicators.
*NOTE for FS2004: Because of changes to FS2004,
the latency time and DirectX version are currently only shown for FS2002 players.
These may be available for FS2004 players in a future version of FSHost.
Chat Commands
When a player types a Chat Command in the game's chat window,
a private message is sent back only to that player, showing some information.
FSHost comes pre-configured with a few Chat Commands:
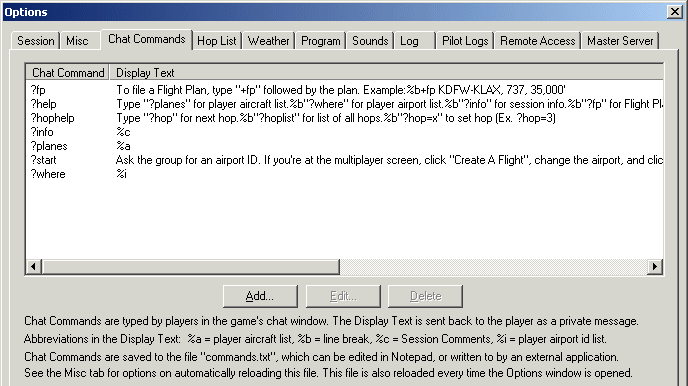
-
?fp - Displays help about how to file a Flight Plan.
-
?help - Displays help about some of the available
commands.
-
?hophelp - Displays help about some of the Hop List
chat commands available.
-
?info - Displays whatever was entered for the Session
Comments. You can set the Comments in the Options / Session window.
-
?planes - Displays a list of players and which aircraft
they're currently flying.
-
?start - Displays help for new players connecting
to an IP game for the first time.
-
?where - Displays a list of players and which airport
ID (i.e. KLAX) they're nearest to.
You can also create your own Chat Commands in the Options /
Chat Commands window.
The special command ?list always shows the full list
of commands on your server.
Other Notes:
-
Abbreviations - Special abbreviations can be used
in the Chat Commands. %a will be replaced with the current player/aircraft
list, %b will be replaced with a line break, %c will be replaced with the
current Session Comments (from the Options / Session window), and %i will
be replaced with the current player/airport ID list.
-
Commands.txt File - Chat Commands are saved in a
special file called "commands.txt", which is included with the FSHost program
in the zip file. When you unzip the file, be sure that the "commands.txt"
file is in the same directory as the program. This file is a plain text
file, and can be edited in Notepad (although it's easier to use the Options
/ Chat Commands window to add and edit commands). The file can also be written
to by external programs, in the case that someone wanted to write a program
to update the file with the latest weather data for specific airports, or
any other information. For example, the command ?klax might display the
current weather information, the current runway in use, etc. at Los Angeles
International airport. See the Options / Misc window for a feature to automatically
reload this file on a timer.
Hop Lists
A Hop List is an ordered list of airports that players can fly to when the
server is unattended (sort of like a "treasure hunt"). As they fly to
each airport in the list, the server tells them where to fly to next. Your "Session
Comments" (on the Session tab) and "Welcome Message" (on the Misc tab) should
tell the players to type "?hop" after they connect, to get the instructions
for where to begin.

Creating a Hop List
The first item in the list above should be the starting airport, and
the instructions for it should include directions for how to jump to the
airport using "Create a Flight" or the World menu in Flight Simulator. All
other items should be an airport ID to fly to, along with text explaining
how to get there. You can include whatever you want in the instructions,
including altitude, ILS, and VOR information, or just heading and distance,
as above. The list above starts and ends at the same airport (PHNL),
but that's not required. Players must fly to each airport in order,
and once on the ground (and not paused or slewing), they can type "?hop"
again to get the next destination. The "End text" is shown to the player
after they arrive at the last airport. Usually this would include something
like "Congratulations" and instructions to type ?hop to automatically restart
the trip from the beginning.
Multiple Hop List files
Use the Open, Save, and Save As buttons to manage multiple Hop List files.
You can save files with names such as "hoplist_hawaii.fhl" to keep lists
for different areas of the world, and then easily switch to a different
file later. Each Hop List uses a matching position file. For
example, if you load a Hop List file called "hoplist_test.fhl", then the
program will look for a Hop List player position file called "hoplist_test.fhp"
and load it automatically. If you don't want to use these saved player
positions, you can use the "Reset Player Hop List Positions" command
under the Server menu to set all players back to the first hop. If
the program doesn't find a matching position file, it will automatically
reset all players to the beginning of the Hop List and create a new position
file with a matching filename prefix.
Importing FSNavigator flight plans
The easiest way to create a new Hop List is to import a flight plan file
from FSNavigator. Create your plan in FSNavigator with a list of airports
(not runways), then click the Plan button, select Export, and choose the
"WindowsINI" format to save your file as a .INI file. You can then click
the Open button above to import it into FSHost. All of the entries at the
top of the window will be filled in automatically (replacing any entries
that were already there), and then you just need to set the "End text" if
it's not already set.
Hop List Chat Commands
- Allow "?hoplist" Chat Command - If enabled, players can use this
command to display a list of all hops in the current list. Example
text returned by FSHost: "Hop List: 0-PHNL, 1-PHMK, 2-PHNY, 3-PHOG,
4-JHM, 5-PHLU, 6-PHNG, 7-PHNL". If "Only for hops they've already
been to" is also enabled, only the hops that have been completed already
will be displayed. For example, if the player is on hop 3 of 7, and
both checkboxes are enabled, this command will return only the text, "Hop
List: 0-PHNL, 1-PHMK, 2-PHNY, 3-PHOG (+ 4 more)".
- Allow "?hop=x" Chat Command - If enabled, players can change
their current hop position. For example, "?hop=5" will set the player
to the 5th hop in the list. If "Only for hops they've already been
to" is also enabled, players can only set their position to a hop they've
already completed. Otherwise, they'll get the message, "Sorry, this
server only allows you to change to hops you've already finished."
Once a player finishes a list, they're set back to the beginning of the
list, but FSHost remembers that they've completed it, so they can still
use the "?hop=x" command to change to any hop position. FSHost saves
this "highest hop position" in the Hop List Position file (.FHP extension),
so it's remembered even if the player disconnects or the admin switches
FSHost to a different Hop List and then back to the current one.
Other notes
- As of FSHost 2.4, Hop List files have the extension .FHL. If
you created files with FSHost 2.3, just rename the .TXT extension to .FHL
and then use the Open button above to load them into the program. For example,
if you have a file called "hoplist_hawaii.txt", just rename it to "hoplist_hawaii.fhl"
for use in FSHost 2.4 and above.
- Players reconnecting to the game. When a player is part of the
way through a Hop List and then disconnects, their position is saved so
that when they reconnect, they'll be able to resume where they left off.
This information is saved to a file, so that even if you restart FSHost,
it'll still remember it. See "Multiple Hop List files", above, and
the notes below, for more.
- Editing a player's Hop List position. You can right-click
a player's name in the main window and select "Edit Player's Hop List Position"
to manually set them to a different hop.
- Hop List Position files (.FHP) are used by FSHost to save each
player's "highest hop position" for each Hop List. So for example
if you're using a Hop List file called "hoplist_hawaii.fhl", FSHost will
automatically create a Hop List Position file named "hoplist_hawaii.fhp"
to hold each player's highest hop position for that particular Hop List.
Normally you don't need to manually edit the .fhp files because you can
edit a player's position through FSHost by right-clicking their name and
selecting "Edit Player's Hop List Position". But if you need to edit
these files to remove players that aren't currently connected to the server,
you can open them in Notepad. Be careful when editing these files
because each character needs to be in the proper place for FSHost to be
able to read them. You might consider making a backup of the file
before editing it. Note that each column of data is separated by a
tab, not by spaces. The format for each line is:
<player-name><tab><current-hop><tab><highest-hop-started><tab><last-time-any-hop-completed><tab><time-hop-list-first-completed>
For example, this line is for the player "Russell", showing that his current
hop number is 3, his highest hop started is 5, the last time he completed
a hop was 169060495 (see below) and he has not yet completed the entire
hop list (the last field is a zero):
Russell 3 5 1169060495 0
The fields <last-time-any-hop-completed> and <time-hop-list-first-completed>
are in standard computer time format, which is the number of seconds since
January 1, 1970. In the example above, the time value "1169060495"
represents January 17, 2007 at 13:01:35. For help with creating these
numbers, try
this search on Google.
Hop List Races
A Hop List Race is a list of touch-and-go airports that players must complete
while FSHost officiates. FSHost makes sure that everyone completes all
the hops, and that nobody slews or changes their simulation rate, and then announces
the winner in the chat window.
Creating a Race
Creating a Hop List Race is exactly the same as creating a normal Hop
List (see the Hop Lists section for help), but players
do a touch-and-go at each airport instead of coming to a complete stop.
If you like, you can change the instructions for each airport to mention
a touch-and-go instead of a normal landing. For example, a hop from
KCGX to KORD might have the instructions, "Fly heading 300 for 14nm and
touch-and-go at KORD (Chicago O'Hare), runway 27L."
Starting a Race
Before starting the race, be sure all players understand the rules.
You can refer them to this page, where they can read the standard race rules
(or you're welcome to make up your own page):
http://www.chocolatesoftware.com/fshost/race.html
All players should start at (or near) the first airport in your Hop List
(the airport that you normally tell them to jump to using the World menu).
The first hop of the race will then be to the second airport in your list,
which is the same way normal Hop Lists work (although it sounds a bit strange,
think about it a second and you'll see).
Then ensure that all players are in the same aircraft, and are at a starting
line that you choose. Normally the starting line would be the
beginning of a runway, but you could also do a flying start if you like.
It's easier to have all players turn off aircraft collisions in Flight Simulator,
so that they can all line up on top of each other on the runway. To
disable aircraft collisions, players can go to the Aircraft menu, select
"Realism Settings", and uncheck "Allow collisions with other aircraft".
Players should also disable "Pause on task switch" on the Options / Settings
/ General window, to prevent the game pausing automatically when they change
to a different window.
When everyone is ready, select "Start Hop List Race" from the Server
menu in FSHost and you'll see this window:
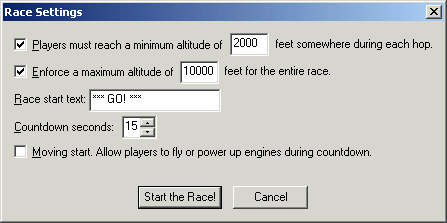
- Minimum altitude - You can specify a minimum altitude that
all players must reach somewhere during each hop. As an example,
if you enter 2000 feet, then all players must climb to at least 2000
feet somewhere during each hop. Once they reach 2000 feet,
FSHost will send them a private chat message letting them know that
they've reached the minimum and that they can change to any altitude
for the rest of that hop.
- Maximum altitude - You can also specify a maximum altitude.
Players must not fly above this altitude anywhere during the race.
- Race start text - The text included in the chat message that's
sent when the race starts. The first hop instructions will automatically
be added after this text. (see below)
- Countdown seconds - The number of seconds to use for the
countdown timer when starting the race.
- Moving start - If enabled, players are allowed to move during
the race countdown. Useful for starting a race while the players
are flying behind a pace aircraft or to allow players to power up engines
during the countdown (which causes slight movement, even with the brakes
set). If not enabled, and a player moves during the countdown,
the countdown is automatically stopped and a message is sent to all
players.
Then click "Start the Race!" and the countdown will begin. The
first chat message sent to all players will include the minimum and maximum
altitudes, if you specified any (if not, then just the countdown time).
For the settings above, the following text would be sent in the first chat
message:
The race will start in 15 seconds...
You must reach 2000 feet somewhere during each hop.
Max altitude is 10000 feet.
Then another chat message will be sent every 5 seconds during the countdown:
The race will start in 10 seconds...
The race will start in 5 seconds...
And then finally the actual starting message, which includes your "Race
start text" above, and the instructions for the first hop, which are added
automatically:
*** GO! *** Fly heading 300 for 14nm and touch-and-go
at KORD (Chicago O'Hare), runway 27L.
During a Race
Players are automatically disqualified if they do any of the following
during the race:
- Slew
- Pause (including changing scenery or date/time)
- Use a simulation rate other than the normal 1X
- Change planes
- Crash
- Complete a hop without reaching the minimum altitude somewhere during
the hop (if a minimum is specified)
- Fly higher than the maximum altitude for the race (if a maximum
is specified)
- Skip a hop (or take off from an airport before waiting for FSHost
to give them the next hop instructions)
When a player is disqualified, it's announced in the chat window for
all players to see. The player's name is also shown in the Player
List with "(D)" in front of his Hop info. For example, if the player
is on hop 1 and is disqualified, the Hop column will show "(D)1-PHNL".
The player can then complete the race if he chooses, but cannot win.
It's very important that players
understand that after landing at an airport, they must slow down until they
receive the next hop instructions in the chat window from FSHost before
taking off again. Usually this happens when their speed goes
below 60 kts (you can configure the Maximum On-Ground Speed on the Options
/ Pilot Logs window). However, if the airport they're landing at has a rough
runway with gravel or dirt, it's possible that FSHost may not see them as
"on the ground" until they get to a speed much lower than 60 kts.
Failure to wait for the next hop instructions in the chat window will result
in a disqualification when they land at the next hop. Usually, explaining
that they must wait for the chat message works better than telling
them they have to slow to less than 60 kts, since that's actually what's
required.
You can manually change a player's disqualification status by right-clicking
the player's name and selecting "Edit Player's Race Status".
Race Observers
When a player is a race observer, he can't be disqualified, and will
have no effect on the status of the race if he changes hop position, slews,
jumps to another airport, changes planes, etc. This feature is intended
for players acting as race admins, so they can still slew to watch the race
without being announced as disqualified. To change a player to a race
observer, right-click the player's name and select "Edit Player's Race Status".
The player will then be shown in the Player List with "(O)" in front of
his Hop info. For example, if the player is on hop 1 and is a race
observer, the Hop column will show "(O)1-PHNL".
Ending a Race
The race will stop automatically when the first non-disqualified player
reaches the last airport in the Hop List and slows down enough to get an
"on-ground" status in FSHost (usually below 60 kts, but see note above).
The winner will then be announced in the chat window for all players to
see. If a disqualified player reaches the last airport first, they
will receive a message telling them that they did not win the race, and
the race will continue until the first non-disqualified player finishes.
The race will also stop automatically when all players are disqualified.
You can manually stop the race at any time by selecting "Stop Hop List
Race" from the Server menu. A chat message is then sent to all players
telling them that the race was stopped.
Other Notes
Weather
The Weather tab lets you setup a custom weather pattern to be
sent to all players.
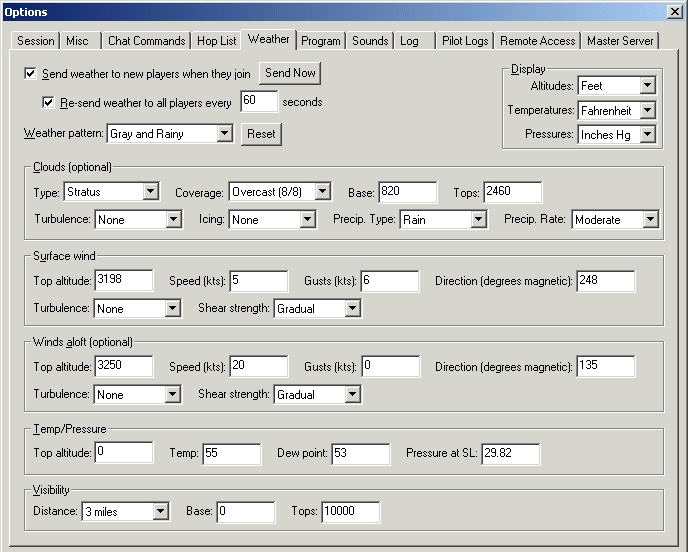
-
Send weather to new players when they join - Players
are set to the current weather pattern when they first connect to FSHost.
-
Re-send weather to all players every X seconds -
The current weather pattern is re-sent to all players on a timed basis.
This ensures that all players are using your custom weather. Players
should disable Real-world weather in Flight Simulator, as well as any external
weather programs. If this option is not checked, players will get
the current weather when they first join, but can then change it to whatever
they want.
-
Weather pattern - Start by selecting from a list
of pre-defined weather patterns. You can then customize it by changing
any of the settings on the page. Press the Reset button to set everything
back to the pre-defined settings if you decide to abort the changes you've
made.
-
Display (Altitudes, Temperatures, and Pressures)
- Allows you to choose Feet/Meters, Fahrenheit/Celcius, and Inches Hg/Millibars.
When any of these settings are changed, the current weather pattern is reset
to the default settings, so it's best to make these choices before customizing
a pre-defined pattern.
Program Options
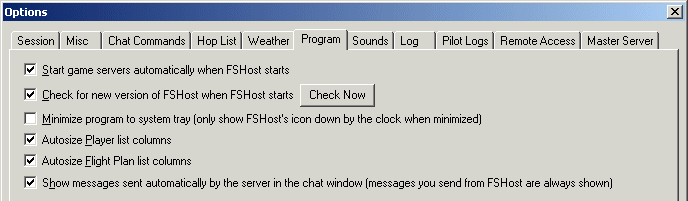
-
Start game servers automatically when FSHost starts
- The game server starts as soon as you start FSHost.
-
Check for new version of FSHost when FSHost starts
- The program checks the web site for a new version. This ensures you always
have the latest version of FSHost.
-
Minimize program to system tray - When you minimize
the program, it's only visible in the system tray, near the Windows clock.
-
Autosize Player list columns - If checked, columns
are automatically sized to fit the content whenever the list changes.
If not checked, column positions are saved and do not change when the list
changes.
-
Autosize Flight Plan list columns - If checked, columns
are automatically sized to fit the content whenever the list changes.
If not checked, column positions are saved and do not change when the list
changes.
-
Show messages sent automatically by the server in the
chat window - When unchecked, messages sent automatically by the server
are not shown in the FSHost chat window. This includes the welcome
message, auto-announcements, responses to Chat Commands, etc.
Pilot Logs
Pilot Logs are log files created for each player to log detailed information
during their flight. Several options are available:
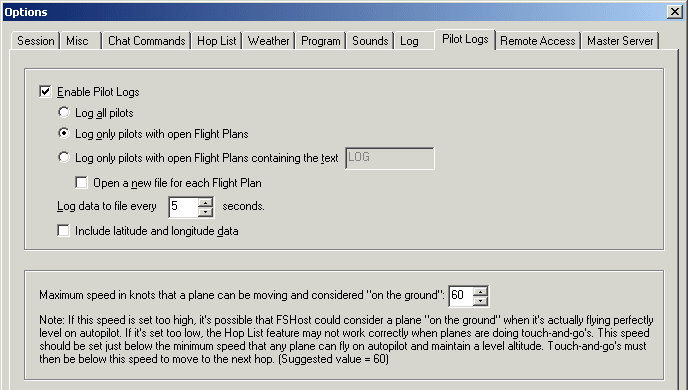
Files are created automatically in the "PilotLogs" subdirectory.
Each player has their own Pilot Log file, created daily. For example,
the file "OzzieYank_030919.log" was created for player OzzieYank on September
19th, 2003. If the same player connects again on September 20th, a new
file will be created to log all flights on that day. Note that if a player
connects before midnight and then stays connected past midnight, the entire
connection will be logged to the original file created when he first connected.
If however, he disconnects after midnight and then immediately reconnects, a
new file will be started using the new date.
Open a new file for each Flight Plan - This option is
available when either "Log only pilots with open Flight Plans" or "Log only
pilots with open Flight Plans containing the text.." is selected. This
option causes a new pilot log file to be created for each new Flight Plan the
player opens. The filename contains the player's name, the date and time
the Flight Plan was opened, and the actual Flight Plan itself. For example:
"OzzieYank_030919_151827_KDFW-KLAX 35000' VFR" was created when OzzieYank opened
the Flight Plan "KDFW-KLAX 35000' VFR" on September 19th, 2003 at 3:18 PM and
27 seconds.
Maximum "on-ground" speed. This option allows you
to configure the maximum speed in knots that a plane can be moving and considered
"on the ground". This also affects Hop Lists created with "touch-and-go"
airports, since the pilot must slow down below this speed to automatically receive
the next hop information before taking off again.
Remote Access (web interface)
Remote Access allows players and admins to connect to FSHost with a web browser.
You can setup Remote Access in the Options window, on the Remote Access tab.
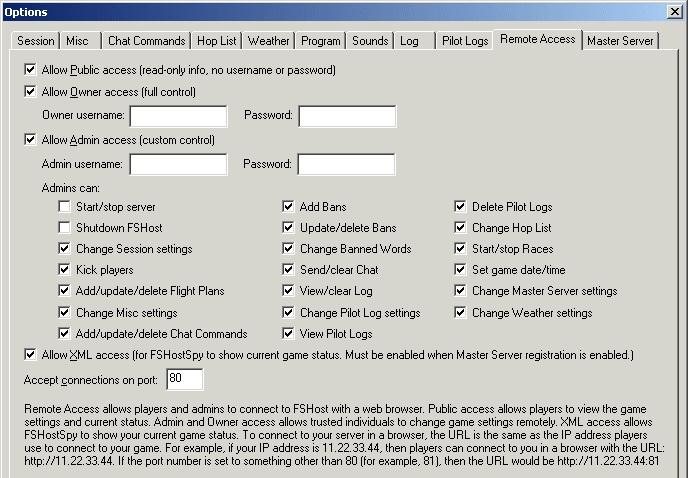
There are 4 levels of access
With Public access, users can see all of the Session options (max number
of players, session name, etc.) the player list (player names, aircraft,
etc.), and the Flight Plans. Public users connect without a username and
password, and cannot change any settings on the server.
With Admin access, trusted individuals can change whatever settings you
want to allow them to have access to. You can set the Admin username and
password, and then give the information to people you trust with the server.
You can also specify which features you want to allow your admins to have
access to. If they don't have access to a particular feature, they'll see
a red X next to the button on the web
page, and they'll be restricted from performing that action. For example,
you might give them access to the Kick & Ban feature, but maybe not the
ability to start and stop the server. All Admins share the same username
and password, as well as feature restrictions. If an Admin abuses his power,
just change the password and inform the other Admins.
Owner access is intended to be used only by you, the person actually
running FSHost. You have full access to all features, so you can change
all the settings, Kick & Ban, even start and stop the server. You can set
the Owner username and password, which are separate from the ones used by
Admins.
- XML
XML access is required when registering with the Master
Server so that FSHostSpy
can retrieve the current status of your game. This data is basically
the same info as on the Remote Access "Public" page, but condensed into
a format that's easier for programs to read. If you're curious, you
can view the XML data of your own server by going to a URL such as this
in Internet Explorer: "http://11.22.33.44/xml" (where 11.22.33.44 is your
machine's IP address, which you can find
here). See
the Master Server section for more info.
Connect to your server with Remote Access
Connecting to FSHost in a web browser is easy. Just use the same IP address
that people use when connecting in the game. For example, if your IP address
is 11.22.33.44, then just type this URL into your web browser to connect
via Remote Access: http://11.22.33.44. That address will show
the Public page, and will not require a username and password. From the
Public page, you and your Admins can click the "RemoteAccess Login" link
to access the secure features. When you click this link, you'll be prompted
for a username and password. Type in either the Admin username and password,
or the Owner username and password. You'll have access to different features
depending on how you login. When you start the server in FSHost, it'll print
out your current IP address in the log window. You can also view your own
IP address on several web sites, including
www.whatismyipaddress.com.
If you already run a web server
If you already have a web server running on the same machine as FSHost,
then it is most likely using the standard "port" number for web servers,
which is port 80. Since FSHost will also try to use port 80 by default,
you'll need to change FSHost's port number (to 81, for example), on the
Options / Remote Access page.
Running Remote Access on Multiple Copies of FSHost
If you have multiple copies of FSHost running on the same machine, each
one should use a different Remote Access port number (81, 82, 83, etc.).
You can change the port in the Options / Remote Access window. For example,
if you use port 81 for your Free Flight game, then people would use this
URL to connect to your server in a web browser: http://11.22.33.44:81
(Note the :81 at the end of the URL, which specifies which port to use.
When using port 80, which is the default, it's not necessary to include
the port number in the URL). Please see the section
Running Multiple Copies of FSHost for more info.
Custom "User" web pages
You can also create your own custom "user" web pages, with
images and information about your server. You can include special rules
on your server, pictures of the planes you like to fly, or anything else
you want to put on your pages.
For security reasons (to prevent hackers from gaining access
to your machine), FSHost has strict rules about which files it will serve.
All user files must begin with the word "user", and must end with one of
the following extensions:
-
.htm
-
.html
-
.css
-
.txt
-
.xml
-
.gif
-
.jpg
-
.jpeg
-
.bmp
-
.png
For example, you can create an html page called "user.html",
and have an image on it called "user.gif". If you want to serve more files,
you can call them "user2.html", "user3.html", etc. And the images
might be named "user2.gif", "user3.gif", etc.
Note that only numbers can be used after the word "user"
in the filename. "user123.html" is legal, but "userABC.html" is not.
All user files must be in the same directory as the FSHost
program.
You can create a link from the Public web page (edit the
template file "RemoteAccessPublic.html") to your user page by adding a link
such as:
<a href="/user.html">Click here for information about
this server</a>
You can also use several special codes in your HTML pages.
These codes are replaced with information from the server when the page
is requested. All of the codes used by the Public page (RemoteAccessPublic.html)
can also be used in your User pages. Look for the ^^ that surround the codes
-- for example: ^^session_name^^ will be replaced with the current Session
Name, which is entered in the Options / Session window.
User web pages are always accessible whenever any of the
three Remote Access levels (Public, Admin, or Owner) are enabled. If you
decide not to show your user pages, just move them to a different directory.
Special variables
All HTML "template" files use special variables that begin
and end with ^^. For example, the variable ^^session_name^^ gets replaced
by FSHost with the Session Name you enter on the Options / Session window.
So if you see ^^session_name^^ in one of the HTML files, it might be replaced
with "My Session" when the HTML page is requested by a web browser via Remote
Access. Some of the RemoteAccessOwner pages use specific variables
available only on that page, but many variables are available for use on
any HTML page, even custom "User" web pages (see above section).
Variables available on all HTML pages:
| Variable |
Replaced With |
Example |
| ^^server_name^^ |
Server Name, from Options / Master Server |
"Public Server" |
| ^^server_url^^ |
Server web site URL, from Options / Master Server |
"http://www.site.com" |
| ^^server_version^^ |
FSHost version |
"3.0" |
|
^^server_run_time^^ |
Days, hours, and minutes FSHost has been running |
"0d 1h 27m" |
|
^^current_time^^ |
Current local time on server |
"08:11 PM" or "20:11", depending on Windows time settings on
server |
| ^^current_date^^ |
Current local date on server |
Depends on Windows time settings on server, but usually
Month/Day/Year or Day/Month/Year or Year/Month/Day. Example:
"09/17/2003" |
| ^^server_ip_address^^ |
Current numeric external IP address |
"11.22.33.44" |
|
^^host_address^^ |
Current "named" external IP address, possibly with dash and
port number |
"www.site.com" or "www.site.com-81" if port is not 80 or "11.22.33.44"
if a named address is not available or "11.22.33.44-81" if a
named address is not available and port is not 80 (dash used
instead of colon, for easier bookmarking) |
|
^^host_address_text^^ |
Current "named" external IP address, possibly with colon and
port number |
"www.site.com" or "www.site.com:81" if port is not 80 or "11.22.33.44"
if a named address is not available or "11.22.33.44:81" if a
named address is not available and port is not 80 (colon used
as normal) |
|
^^remote_access_port^^ |
Remote Access Port from Options / Remote Access |
"80" |
|
^^session_name^^ |
Session Name, from Options / Session |
"My session" |
|
^^session_comments^^ |
Session Comments, from Options / Session |
"Please join at YSSY" |
|
^^password^^ |
Text stating whether a password is required to join |
"Required" or "Not required" |
| ^^directx_version_required^^ |
DirectX version required to join |
"9" or "0" if no specific version required |
| ^^pilots^^ |
Number of pilots connected and max allowed |
"5 (unlimited)" or "5 of 10" |
| ^^cur_pilots^^ |
Number of pilots connected |
"5" |
| ^^max_pilots^^ |
Max pilots allowed or "unlimited" |
"10" or "unlimited" |
| ^^max_pilots_number^^ |
Max pilots allowed |
"10" (always the actual max, even if using unlimited) |
| ^^observers^^ |
Number of observers connected and max allowed |
"5 (unlimited)" or "5 of 10" |
| ^^cur_observers^^ |
Number of observers connected |
"5" |
|
^^max_observers^^ |
Max observers allowed or "unlimited" |
"10" or "unlimited" |
|
^^max_observers_number^^ |
Max observers allowed |
"10" (always the actual max, even if using unlimited) |
|
^^num_flight_plans^^ |
Number of Flight Plans |
"5", or "0" if no Flight Plans |
|
^^host_port_2004^^ |
2004 Host Port, from Options / Session |
"23456" or "0" when 2004 session not running |
|
^^weather_description^^ |
Current weather from Options / Weather |
"Wind: 248/5, Vis: 3 miles, Clouds: overcast (8/8), Precip:
rain, Temp: 55F, Dew: 53F, Altimeter: 29.82", or empty if weather
is not being sent to players when they first join. |
| ^^weather_required^^ |
Text stating whether players must use the current weather
|
"Required" if weather is being re-sent to players every
X seconds, or "Not required" if not being re-sent. |
There are also certain "list" variables available on the public page
(RemoteAccessPublic.html), as well as all custom "User" web pages that end
with .htm, .html, and .xml. These list variables must appear in the
HTML pages between certain "begin" and "end" variables, which mark a block
of HTML code that will be repeated for each item in the list.
The "Player" list begins with the variable ^^begin_player_list^^
and ends with the variable ^^end_player_list^^. Any HTML or
variables between these two markers are repeated once for each real player
or FSNavigator. Take a look at the RemoteAccessPublic.html page for
an example of how this works.
To list only real players, and not FSNavigators, use the begin/end variables
^^begin_player_names_list^^ and ^^end_player_names_list^^
instead.
Here are the variables available in the Player list:
| Variable |
Example |
| ^^player_name^^ |
"OzzieYank" |
| ^^player_id^^ |
"1234" (internal ID number, unique within a 2002/2004 session,
usually unique across 2002/2004 sessions as well) |
| ^^latency_text^^ |
"231 ms" |
| ^^latency^^ |
(HTML "img" tag pointing to a green, yellow, red, or gray
.gif image, with "alt" text such as "Player Latency: 231 ms") |
| ^^game_version^^ |
"2002" or "2004" |
| ^^player_type^^ |
"Pilot", or "Observer" or "FSNavigator" or "Unknown" |
| ^^aircraft^^ |
"Cessna Skyhawk 172SP" |
| ^^connect_time^^ |
"0d 2h 47m" |
| ^^near^^ |
"KCGX" or empty if no airport within 48 miles |
| ^^near_distance^^ |
"17nm" (distance to nearest airport, or empty if distance
is zero or if no nearest airport) |
| ^^altitude^^ |
596' |
| ^^heading^^ |
359° |
| ^^speed^^ |
"127 kts" |
| ^^hop^^ |
"1-KORD" or "(D)1-KORD" (if disqualified from race) or "(O)1-KORD"
(if a race observer) or empty if no hop position |
| ^^dx_version^^ |
"8" or "9", or empty if FSHost is running on a machine with
less than DirectX 9 or player is using FS2004 |
| ^^status^^ |
"Flying" or "Slew/Pause/Rate" or "On ground" or "Not in
plane" or empty if ^^player_type^^ is "FSNavigator" or "Unknown" |
| ^^latitude^^ |
N41°51.24' |
|
^^longitude^^ |
W087°
36.45' |
| The following variables can be used anywhere
on the page when a Player list is used somewhere on the same
page: |
| ^^num_pilots^^ |
5 |
|
^^of_max_pilots^^ |
"unlimited" or "of 10" |
| ^^num_observers^^ |
5 |
| ^^of_max_observers^^ |
"unlimited" or "of 10" |
The "Flight Plan" list begins with the variable ^^begin_flight_plan_list^^
and ends with the variable ^^end_flight_plan_list^^. Any HTML or variables
between these two markers are repeated once for each Flight Plan.
Take a look at the RemoteAccessPublic.html page for an example of how this
works. Here are the variables available in the Flight Plan list:
|
Variable |
Example |
|
^^player_name^^ |
"OzzieYank" |
|
^^flight_plan^^ |
"KDFW-YSSY, 737, 35000', IFR" |
|
^^flight_plan_id^^ |
"1234" (internal ID number, unique for all players regardless
of game type) |
|
^^status^^ |
"Filed" or "Open" or "Closed" |
|
^^status_color^^ |
"blue" (for Filed), "darkgreen" (for Open) or "red" (for Closed) |
|
^^flight_plan_status^^ |
(HTML "img" tag pointing to a filed, open, or closed .gif image,
with "alt" text such as "Flight Plan: closed, Flying Time: 0d
1h 27m, Slew/Pause/Rate Time: 0d 1h 27m, On-ground Airports:
KCGX, KORD") |
|
^^time_filed_text^^ |
"08:11 AM (+02:27)" (time plan was filed, with minutes and seconds
of waiting time) |
|
^^time_filed_class^^ |
"FlightPlanFiled" or "FlightPlanNormal" (see the CSS StyleSheet
classes in "user.css") |
|
^^time_filed^^ |
"<font color=blue>08:11 AM (+02:27)</font>" (time plan was filed,
with the HTML font color tags if Filed) or "08:11 AM" (if Open
or Closed) |
|
^^time_opened_text^^ |
"08:11 AM" (time plan was opened) |
|
^^open_time_text^^ |
"0d 1h 27m" (length of time plan has been open) |
|
^^open_time_class^^ |
"FlightPlanFiled" or "FlightPlanOpen" or "FlightPlanClosed"
(see the CSS StyleSheet classes in "user.css") |
|
^^time_closed_text^^ |
"08:11 AM" (time plan was closed) |
|
^^row_class^^ |
"RowDark" or "RowLight" (see the CSS StyleSheet classes in "user.css") |
The "Hop List Completed" list contains the players that have completed
the entire Hop List. Each player is listed only once, and the time
completed is the time the player first completed the list. It begins
with the variable ^^begin_hop_completed_list(rows,sort)^^ and ends with
the variable ^^end_hop_list_completed_list^^. Any HTML or variables
between these two markers are repeated once for each player that has completed
the entire list. The begin command also contains two parameters in
the parentheses, which control the number of rows to display (zero for all
rows) and the sort order (0 = sort by oldest time first, 1 = sort by most
recent time first, 2 = sort by name), respectively. For example, to
display all players that have completed the entire list, sorted by oldest
time first, use the begin command: ^^begin_hop_list_completed_list(0,0)^^
Take a look at the User999.html page for an example of how this works.
Here are the variables available in the Hop List Completed list:
|
Variable |
Example |
|
^^player_name^^ |
"OzzieYank" |
|
^^row_num^^ |
1, 2, 3... |
|
^^time_list_completed^^ |
"09/19/2003 05:09 PM" (format depends on Windows settings for
the server) |
|
The following variables can be used anywhere on the page
when a Hop List Completed list is used somewhere on the same
page: |
|
^^num_hop_list_completed_rows^^ |
"5", or "0" if no rows |
The "Hop Completed" list contains the players that have completed
hops. It begins with the variable ^^begin_hop_list_completed_list(rows,sort)^^
and ends with the variable ^^end_hop_completed_list^^. Any HTML or
variables between these two markers are repeated once for each completed
hop. The begin command also contains two parameters in the parentheses,
which control the number of rows to display (zero for all rows) and the
sort order (0 = sort by oldest time first, 1 = sort by most recent time
first, 2 = sort by name, 3 = sort by lowest hop first, 4 = sort by highest
hop first), respectively. For example, to display only the 20 most
recent hops completed, use the begin command: ^^begin_hop_completed_list(20,1)^^
Take a look at the User999.html page for an example of how this works.
Here are the variables available in the Hop Completed list:
|
Variable |
Example |
|
^^player_name^^ |
"OzzieYank" |
|
^^hop_num^^ |
1 |
|
^^hop_name^^ |
PHMK |
|
^^time_hop_completed^^ |
"09/19/2003 05:09 PM" (format depends on Windows settings for
the server) |
|
The following variables can be used anywhere on the page
when a Hop Completed list is used somewhere on the same page: |
|
^^num_hop_completed_rows^^ |
"5", or "0" if no rows |
Conditional Text
This allows you to conditionally display text (or variables) in a template
based on the value of a variable. For example, you can make the template
display certain text about the user's nearest airport only if the user has
a nearest airport (if the ^^near^^ variable isn't empty). The BEGIN
and END commands below can be on the same line or separate lines.
- ^^BEGIN_IF(a,b,c)^^ - This command starts a block of text
that should be shown only if the condition between the parentheses is
true. Several options are available for the condition:
- Variable is equal or not equal to text - Condition is
true if the specified variable contains certain text. Example:
^^BEGIN_IF(near,=,KCGX)^^ This condition is true if the variable
^^near^^ contains the text "KCGX". You can also use "==" instead
of "=". Use "!=" or "<>" to make the condition true when the
variable does not equal the specified text. Example:
^^BEGIN_IF(near,!=,KCGX)^^ or ^^BEGIN_IF(near,<>,KCGX)^^
- Variable is empty or not empty - Condition is true if
the specified variable is empty or not empty. For these conditions,
leave the third parameter (the text after the second comma) empty.
For example, to make the condition true when the server is sending
weather to new players (when the variable is not empty), use:
^^BEGIN_IF(weather_description,!=,)^^. Or to make the condition
true when the server is not sending weather to new players
(when the variable is empty), use: ^^BEGIN_IF(weather_description,=,)^^.
- Variable is greater than or less than a number - Condition
is true if the specified variable contains a number greater than
or less than the specified number. For example, to make the
condition true when the number of pilots on the server is greater
than 5, use: ^^BEGIN_IF(cur_pilots,>,5)^^. Or to make
the condition true when the number of observers on the server is
less than 3, use: ^^BEGIN_IF(cur_observers,<,3)^^. Note
that only numbers should be used as the third parameter (the part
after the second comma) -- do not include any text in this parameter.
- ^^END_IF^^ - This command ends a block of conditional text.
All text and HTML between the BEGIN and END commands will only be shown
if the condition is true.
Example - This example shows how to display the current weather,
if weather is being used on the server, as well as whether players are required
to use this weather or not. It uses one outer BEGIN/END section for
the entire block, and two nested BEGIN/END sections to display individual
lines. This example has the BEGIN and END commands on separate lines,
but they can also be on the same line if it's more convenient.
^^BEGIN_IF(weather_description,!=,)^^
(this entire block is only shown if ^^weather_description^^ is not empty)
<b>Weather set automatically by server:</b> ^^weather_description^^<br>
(variable is replaced with current weather description)
^^BEGIN_IF(weather_required,=,Required)^^
(the next line is only shown if weather is being
re-sent to players)
This weather is required.
(Please disable external weather programs and real-world weather)
^^END_IF^^
^^BEGIN_IF(weather_required,!=,Required)^^
(the next line is only shown if weather is
not being re-sent to players)
This weather is not required.
(You can change it after joining)
^^END_IF^^
^^END_IF^^ (marks the end of the block started
by the BEGIN_IF statement 8 lines above)
See the file "RemoteAccessPublic.html" for a few more examples.
Kneeboard web page for FS2004
If you have FS2004, you can use the Kneeboard to show any HTML page.
FSHost comes with a special page that's formatted to fit in the Kneeboard
window, to show the current status of all pilots.
To setup the Kneeboard, edit the file "kneeboard_keys.htm" in your FS2004
Aircraft directory with a text editor such as Notepad. (Usually this is
in "C:\Program Files\Microsoft Games\Flight Simulator 9\Aircraft")
Add the following lines to the file, just below the 3rd line that contains
"</head>":
<form>
Enter URL: <input type=text size=30 name=url value="http://">
<input type=button value=Submit onClick="location.href = this.form.url.value;">
</form>
Then in FS2004, open the Kneeboard by pressing F10. Then use your
mouse to click the "A" button in that window. That will bring up the "Key
Commands" page you just edited. Enter the IP address of the FSHost
server, which is the same address you use to connect to it in FS2004.
Then click Submit, and it should load the Public page for that server. You
can then click the "Kneeboard" link at the top of that page and it will
load the special page formatted to fit in the Kneeboard.
Other notes
- HTML Files - Remote Access uses several HTML "template" files,
which are included with the FSHost program in the zip file. When you unzip
the files, be sure that all the HTML files are in the same directory as
the FSHost executable itself. Also, if you create a shortcut to FSHost,
right-click the shortcut, select Properties, and make sure the "Start in"
line is set to the directory where FSHost is located. If this isn't the
case, you may see an error message when you try to connect to FSHost in
the browser.
- Modifying your HTML Files - You're welcome to modify your HTML
files however you like. But if you only want to make changes to the
colors and style of the pages, try changing the "User.css" (StyleSheet)
file instead. This will automatically change all HTML files to use
the same styles. That way, when a new version of FSHost is released,
you can just keep your existing User.css file, and overwrite all of the
HTML files, which may have new features added to them.
- Security - FSHost is very careful about what it will give back
to the user in the browser. Most web servers use the URL to figure out which
file to send back to the user. For example, if the URL is http://www.abc.com/somefile.html,
then the server will open the file "somefile.html" and send it back to the
browser. FSHost never opens files requested by the browser. Instead,
it looks at just the command that was submitted (show players, show chat,
etc.), and then sends back one of the HTML template files, with the current
data filled in. For this reason, FSHost is much more secure than most web
servers.
Master Server
FSHost registers with a "Master Server" to let it know when your server's
running. Players can then run
FSHostSpy to view a list of
FSHost servers currently available, as well as each game's session details,
player names, aircraft, altitude, heading, speed, flight plans, etc. The
"Master Server" tab on the Options window has settings for configuring how your
server is seen in FSHostSpy:
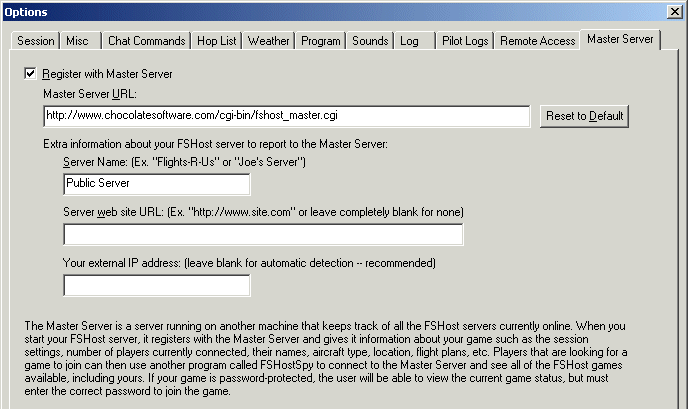
- Master Server URL - This is the address of the current Master
Server, and usually does not need to be changed.
- Server Name - The name your server should be displayed with,
such as the name of your organization or just "OzzieYank's Server".
FSHostSpy will also show the current "Session Name", which refers to the
specific game you're running right now, such as "Free Flight", etc.
You can set the Session Name on the Session tab.
- Server web site URL - The web address of your organization, or
your homepage address. FSHostSpy will show a button that players can
click to jump to your web site. Leave completely blank for none.
- Your external IP address - The IP address that players should
use when connecting to your server. It's normal for this field to
sometimes be blank before FSHost has registered with the Master Server,
but it will be filled in automatically after registration. You can
also edit this address if you know that it's incorrect (because of a local
network or web proxy that may interfere with the automatic detection).
Usually though, this address will be handled automatically and it should
be left blank.
Other notes
-
If your game is password-protected, players will be able
to view the game's current status, but will still have to enter the correct
password to join the game.
-
FSHostSpy retrieves "XML" data from each FSHost server to
be able to display its current status. This data is basically the
same info as on the Remote Access "Public" page, but condensed into a format
that's easier for programs to read. If you're curious, you can view
the XML data of your own server by going to a URL such as this in Internet
Explorer: "http://11.22.33.44/xml" (where 11.22.33.44 is your machine's
external IP address).
-
"XML" access must be enabled on the Remote Access tab for
FSHostSpy to be able to retrieve the current status of your server.
However, you can still configure Remote Access to use any port number (80,
81, etc.).
Plane Translations (when running 2002 and 2004 sessions)
Some planes are included with FS2002 but not FS2004, or vice versa.
When a player is using one of these planes, players in the opposite session
(2002 or 2004) will see the wrong plane for this person (usually they'll see
whatever they're flying themselves, or the last default plane they used).
FSHost can help with this problem by automatically translating certain plane
names to a different plane that's somewhat similar in the other version of Flight
Simulator. For example, if a player was flying the "Cessna Skylane 182R
RG" in FS2002, players in FS2004 wouldn't be able to see the plane because it's
not included with FS2004. But FSHost can translate this plane to a "Cessna
Skylane 182S", which is similar in size and speed, so the FS2004 players can
at least see a similar plane.
All of the default 2002/2004 planes that are missing from the opposite version
are included in a file called "planes.txt", which should be in the same directory
as the FSHost program. You can edit this file in a plain-text editor such
as Notepad to modify the translations or add new ones. Instructions are
included at the top of the file, as well as a warning about using it with non-default
(3rd party) aircraft.
Planes that are in FS2002 but not FS2004:
- Cessna Skylane 182R RG
- F4U-1A Corsair
- Sopwith Camel
Planes that are in FS2004 but not FS2002:
- Curtiss Jenny
- de Havilland Comet
- Douglas DC-3
- Ford Tri-Motor
- Lockheed Vega
- Piper Cub
- Robinson R22 (helicopter)
- Ryan NYP
- Vickers Vimy
- Wright Flyer
Flight Plans
Flight Plans are very useful when running an ATC (Air Traffic Control) session.
But they can also be used in normal Free Flight games, to let pilots know where
everyone's flying. Users file a Flight Plan from inside their game with
a special chat command (+fp), and the plan becomes "filed", but not yet "open".
The controller (maybe you, or someone else running ATC on your server) approves
the plan, and changes it to "open". When the player is finished flying the plan,
it can be "closed" with another chat command (-fp). The controller can also
file a plan for a player, or edit and delete the plan. Flight Plans appear in
the middle window inside FSHost.
For example, let's say a player files a Flight Plan from Dallas to Los Angeles,
flying in a 737, at 35,000 feet. To do this, the player might type something
like this in the game's chat window:
+fp KDFW-KLAX, 737, 35,000'
This is how it appears in the Flight Plan window (and it's also visible on
the web page, via Remote Access):

The Flight Plan in the picture above has been "filed", but is
not yet "open". Note the blue question mark ?
and the two times under the "Filed" column. The first time (07:19 PM)
is the time the plan was filed. The second time(+00:12) is a count-up timer
that changes once a second, and shows how many minutes and seconds the player
has waited for the plan to be approved and "opened".
The controller can change the plan to be "open" by double-clicking
the plan, or by right-clicking it and selecting "Open" from the popup menu.
When a controller opens the plan, it changes to look like this:

In the picture above, the green circle shows that the plan is
now "open", and the time the plan was opened is shown in the Opened column.
Also note that the "Open Time" column now displays how long this plan has been
open -- in this case, 0 days, 0 hours, and 4 minutes.
When the player is ready to close the plan (usually when the
flight is finished), he/she can close it by typing "-fp" (without the quotes)
in the chat window of the game. The controller can also close the plan, either
by double-clicking it, or by right-clicking it and selecting "Close" from the
popup menu. The plan then changes to look like this:

The red bar now indicates that the plan is closed, and the time
the plan was closed is shown in the "Closed" column. Note that the Open Time
column will stop counting, and remain fixed at the total time the plan was open
(the time between when it was "opened" and "closed").
Other Notes:
-
?fp - for help explaining how to file a plan.
If the player already has a plan, this command displays it in the chat
window, along with how long the plan has been filed/open/closed.
-
+fp - to file a plan. Example: +fp KDFW-KLAX,
737, 35,000'
-
-fp - to close a plan that's either "filed" or
"open".
-
Re-opening a Plan - After a plan has been closed,
it can be re-opened by the controller. When this happens, the "opened" time
is not changed. The Open Time begins counting up again, showing the
difference between when the plan was originally opened and the current
time. For example, consider a plan that was originally opened at 5:00, and
closed at 6:00. The total Open Time for the plan will show one hour
(0d 1h 0m). If the plan is re-opened at 6:15, the Open Time will begin counting
up again, starting at "0d 1h 15m", since the difference between when it
was originally opened and the current time is one hour and fifteen
minutes.
-
Re-filing a Plan - There isn't much need to set a
plan back to "filed" again, but if this is done, the "filed" time will be
reset to the current time, and the "opened", "closed", and total open times
will all be reset as well. Instead of setting a plan back to "filed", consider
creating a new plan, either with the same actual plan information, or new
information.
-
When a Player Disconnects - If a player has a Flight
Plan that's either "filed" or "open", and disconnects from the server (either
intentionally, or by accident), the plan remains in its current state for
10 minutes. If the player re-connects to the server with the same name,
the plan (or plans, if there were also old "closed" plans) is/are re-assigned
to the player. In this case, everything remains just as if the player had
never disconnected, and the "filed" or "Open Time" counters continue counting
as they would normally. However, if the player does not re-connect to the
server within 10 minutes, the plan is automatically closed. If the player
then re-connects after the 10 minute limit, the plan is still re-assigned
to the player, but it will be closed. The controller can then re-open the
plan if desired. See the note above about re-opening a Flight Plan.
-
Flight Plans Without a Controller - If your server
will be unattended, or if you want to host a session without an ATC controller,
you may want to enable a feature in the Options / Misc window to automatically
open Flight Plans when they are filed by the player. When this is enabled,
and a player files a plan with the +fp command, the plan is automatically
approved and set to the "open" state from the beginning.
-
Automatically Deleting Old Plans - You can enable
a feature in the Options / Misc window that will automatically delete Flight
Plans that have been closed for a specific number of minutes.
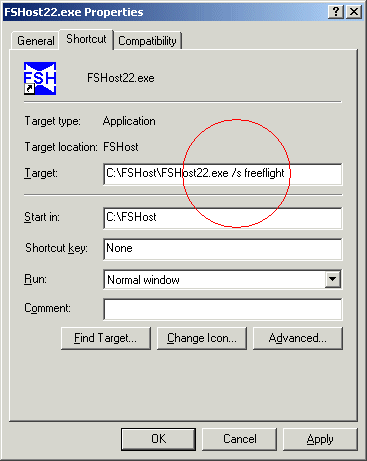
Running Multiple Copies of FSHost
You can run more than one FSHost session on the same machine.
Each session can have its own settings, and can be for a different style of
game (beginners, ATC, free flight, helicopters, etc.). To run another copy of
FSHost, just use the /s option on the command line, followed by a unique session
identifier. The easiest way to do this is to create a shortcut to the program,
and then modify the shortcut.
Creating a shortcut with the /s option
First right-click on the FSHost program, and select "Copy".
Then right-click somewhere in the same directory (or on the desktop, or
wherever you want the shortcut), and select "Paste Shortcut". Then right-click
the shortcut you just created, and look at the "Target" line. At the end
of the line, after the program name, add /s and an identifier name to uniquely
identify this copy of FSHost. The identifier name is never shown to players
connecting to your game, it's just a word that's used to keep this copy
of the game's settings separate from the others in the registry. In the
example below, we're setting up a "Free Flight" server, so we add /s
freeflight to the end of the Target line. (this may look slightly different
in other versions of Windows, but it should be similar)
Note that if you have spaces in the directory path, you'll
need to put double-quotes around the path, but put the /s freeflight
outside of the quotes. For example:
"C:\Program Files\FSHost\FSHost.exe" /s freeflight
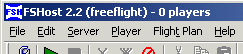
When you run the shortcut, it'll launch FSHost, but with
all the default settings, just as if you were running it for the first time.
You can then customize all the settings for your Free Flight game, and when
you close the program, it'll save your settings for next time. You'll also
see the identifier name (freeflight) in the title bar of the program:
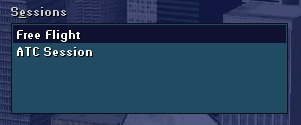
Connecting Flight Simulator to Multiple Copies of FSHost
When a player connects their game to your IP address, they'll
see all of your Session Names listed on the Multiplayer screen, and can
pick which one they want to join:
Running FS2004 sessions with multiple copies of FSHost
If you're hosting FS2004 sessions, you'll need to configure
each copy of FSHost to use a different 2004 Host Port on the Options / Session
window. The first copy of FSHost can use the default 2004 Host Port,
which is 23456. Suggested values for the other copies of FSHost are
23457, 23458, 23459, etc.
Note 1: Most people won't have any trouble
finding your sessions, regardless of which Connect port they have specified
in the FS2004 multiplayer settings. However, some people using
complex networks or NAT servers may need to configure FS2004 to use the
same port that's being used by the session they're trying to join.
This is only if they can't find the session when entering the IP
address and clicking Search. To change the Connect port in FS2004,
click "Multiplayer" on the FS2004 startup screen, then click "Open Multiplayer
Session", then on the screen where you type in the IP address, click "Client
Settings", and set the "Connect" port to be the same as the 2004 Host Port
in FSHost.
Note 2: If you're running FS2004 on the same
machine as FSHost, you'll also need to configure your FS2004 to use a different
port than all of the 2004 Host Ports being used by the multiple copies of
FSHost. Follow the directions in Note 1 above to set your Connect
port to a value such as 23455, and then it should be able to find any of
the FSHost sessions you're running.
Running Remote Access (web interface) with multiple copies
of FSHost
If you're running Remote Access, to allow people to connect
to your server in a web browser, you'll need to configure each copy of FSHost
to use a different Remote Access port. The default port is 80, but you can
usually use ports 81, 82, 83, etc. for the other copies. You can change
the port in the Options / Remote Access window. For example, if you use
port 81 for your Free Flight game, then people would use this URL to connect
to your server in a web browser: http://11.22.33.44:81 (Note the
:81 at the end of the URL, which specifies which port to use. When using
port 80, which is the default, it's not necessary to include the port number
in the URL)
For more info see the Remote Access section.
Firewalls, Routers, and Port Forwarding
Running FSHost is easy but it gets a bit more difficult when using a router and a firewall.
All of the Flight Simulator programs use specific "ports" for the data.
Think of it like this: your external IP address, like 11.22.33.44, is like the
address to get to your house. And a "port", like 80, or 6073, or 23456,
is like a door on your house. Different ports allow different types of
data in. Once the data gets in, it goes to your router, and then the router
has to figure out how to get that data to your PC. But you might have
several PCs connected to the router on your home network, so the router may
not know which PC the data should go to (and it's the same even if you have
only one PC, unfortunately).
That's where "port forwarding" comes in. You tell the router that when
data comes in to your external IP address on a particular port, the router should
forward that data to the PC where you have FSHost running. If you don't
setup the port forwarding, then people out on the internet won't be able to
connect to you, and the FSHost Master Server will report an error.
Now, another note about IP addresses. I said before that your external
IP was like the address to get to your house, so people on the internet could
use it to connect to you. You usually only have one external IP, and it's
shared by all the computers on your home network. But each computer on
your home network also has a unique internal IP address, which is provided
by the router. It's sort of like a fake IP address that's only valid inside
your home network. When you forward a port in your router, you forward
it from your external IP to the internal IP of a particular
computer on your home network, which in this case is the PC running FSHost.
You can find a PC's internal IP
by running the Windows built-in program "Command Prompt", and then typing "ipconfig".
Then look for a line that shows the "IP Address" or "IPv4 Address".
IP addresses can also be either static
or dynamic, and it's better if the FSHost PC has an internal IP that's static.
However, your external IP address from your ISP will almost always be dynamic, which is fine.
See the note below about
Static vs. Dynamic internal IP addresses for more information.
Here's a typical setup for a home network, although your IPs will be different and you may only have one computer.
Note the external and internal IPs, and the port forwarding from the router to whichever PC is running FSHost:
Important: after you get your
router and firewall configured, be sure to test everything with my FSPortTest
program. It'll check all the FSHost and Flight Simulator ports on your PC and
tell you if they're setup correctly.
This forum topic has a download
link and more information.
Important: anyone connecting
to your session will need to configure their router and firewall the same way
(except for port 80 -- that only needs to be done on the PC running FSHost).
They should run FSPortTest on their system as well, to test everything.
Every player in a multiplayer session connects directly with every other player
-- the data is not relayed by the host. If one player in the session doesn't
have things setup correctly, it'll cause problems for everyone else when they
try to connect, because they won't be able to connect to that one player.
Important: things are a lot
easier if you run FSHost and Flight Simulator on the same PC, instead of using
multiple PCs on your local network. This is because when you forward ports
in the router, you can only forward them to one PC at a time, and that PC should
be the one running FSHost. For more information, see the note below about
Using multiple PCs on your local network.
Routers:
Every router has a different way of doing the port forwarding, so I can't
tell you exactly how it'll be done. But if you go to
www.portforward.com,
they have a huge list of instructions for every router ever made -- you
just need to know the brand and model number, which you can get from looking
on the actual router. When you go to that web site, ignore the ad
about buying a program -- you don't need it. Select your router from
the list, and then select FSHost from the list of applications. It'll
then walk you through how to do the port forwarding for your particular
router, for using it with FSHost. It'll also tell you how to find
your internal IP address, and FSHost itself will tell you your external
IP address after it registers successfully with the Master Server.
Here are all the ports that need to be forwarded to the PC running FSHost
(the web site above will list these ports also, but I'll include them here
so you understand which ones you might have to change, and why):
- TCP 80 (or your Remote Access port on Server / Options / Remote
Access tab of FSHost)
- TCP 47624
- UDP 2300 to 2400
- UDP 23456 (or your "2004 host port" on the Server / Options / Session
tab of FSHost)
- UDP 6073
Firewalls:
Windows 7 and Windows 10 firewall:
-
In Windows 7, go to Control Panel / System and Security / Windows Firewall.
In Windows 10, go to Settings / Network & Internet / Ethernet / Windows Firewall.
-
Click "Advanced settings" on the left side of the page.
This will open a window named "Windows Firewall with Advanced Security". Maximize the
window and then in the upper left, select "Inbound Rules".
- In the upper right, click "New Rule", and enter the TCP ports first:
- Select "Port" and click Next.
- Select "TCP" and "Specific local ports". Then enter the ports
like this but without quotes: "47624, 80" (refer to the list of
ports above and make sure yours are the same in FSHost). Then click
Next.
- Select "Allow the connection", and click Next.
- Then leave Domain, Private, and Public all checked, and click
Next.
- For the Name, enter something like "Flight Sim TCP", and click
Finish. (Your new rule "Flight Sim TCP" may be at the top of the
list instead of sorted correctly.)
- In the upper right, click "New Rule" again, and enter the UDP ports:
- Select "Port" and click Next.
- Select "UDP" and "Specific local ports". Then enter the ports
like this but without quotes: "2300-2400, 23456, 6073" (refer to
the list of ports above and make sure yours are the same in FSHost).
Then click Next.
- Select "Allow the connection", and click Next.
- Then leave Domain, Private, and Public all checked, and click
Next.
- For the Name, enter something like "Flight Sim UDP", and click
Finish. (Your new rule "Flight Sim UDP" may be at the top of the
list instead of sorted correctly.)
Windows Vista firewall:
- Go to Control Panel / Windows Firewall, click "Change settings",
and then change to the Exceptions tab.
- Add the first port:
- Click the "Add port" button.
- For the "Name", enter something like "FS TCP 47624".
- For the "Port number", enter 47624.
- Select "TCP".
- Click OK.
- Repeat these steps to add each port listed above.
- Note about UDP ports 2300-2400: unfortunately Windows
Vista doesn't allow a range of ports to be entered. But instead of adding
each port individually, just enter the first five or so, and usually
Flight Simulator will pick one of those and it'll be fine (even if you
have more than five players connected to the session). So repeat the
steps above to add UDP 2300, 2301, 2302, 2303, and 2304.
Windows XP firewall:
- Go to Control Panel / Windows Firewall, and change to the Advanced
tab.
- In the white box near the top, you should see a list of network
connections. Yours might be called "Local Area Connection" or "Wireless
Network Connection". Check the checkbox next to the one(s) you're using
and then click the Settings button just to the right of that list.
- Add the first port:
- Click the Add button.
- For the "Description of service", enter something like "FS TCP
47624".
- For the "Name or IP address", enter the internal IP
address of the PC running FSHost. (see notes above about IP's) Most
internal IP addresses begin with 192.168, but not always.
- Enter 47624 for both the External and Internal Port number,
and select TCP. Then click OK.
- Repeat these steps to add each port listed above.
- Note about TCP port 80: you may get an error when
adding this port. Windows XP already includes an entry for that port,
called "Web Server (HTTP)". Instead of adding a new entry for TCP port
80, just use the "Web Server (HTTP)" entry instead. First check the
checkbox next to it, and then click Edit. For the "Name or IP address",
enter the internal IP address of the PC running FSHost. Then
click OK.
- Note about UDP ports 2300-2400: unfortunately Windows
XP doesn't allow a range of ports to be entered. But instead of adding
each port individually, just enter the first five or so, and usually
Flight Simulator will pick one of those and it'll be fine (even if you
have more than five players connected to the session). So repeat the
steps above to add UDP 2300, 2301, 2302, 2303, and 2304.
Test with FSPortTest:
Important: be sure to test your router and firewall
settings with my FSPortTest program. It'll check all the
FSHost and Flight Simulator ports on your PC and tell you if they're setup
correctly. This forum topic
has a download link and more information.
FSNavigator port:
Although FSNavigator technically uses UDP port 23432 to connect to a
session, it always tries UDP port 6073 as well, since that's the "alternate
DirectPlay port". For that reason, you really only need to forward
the ports listed above, and there's no need to forward UDP port 23432 at
all. As a matter of fact, FSHost doesn't listen to port 23432, so
FSNavigator will never actually connect on 23432 -- it will always
connect initially on 6073, and then switch to a port in the 2302-2400 range.
Static vs. Dynamic internal IP addresses:
Each computer on your home network has a unique internal IP
address, which is provided by the router. It's sort of like a fake
IP address that's only valid inside your home network. That internal
lP address can be either static or dynamic.
Static IP addresses are assigned to a specific computer, and never change.
So you might setup your FSHost PC to have a static internal IP address of
192.168.0.2 (or whatever is appropriate with your particular router).
That PC will always have that IP address, and you can setup your router
to forward data to that PC via port forwarding and not have to
worry about the IP address ever changing.
Dynamic IP addresses are assigned by the router each time the computer
connects to the network, and the IP address can be different each time.
So you might have a laptop that connects to lots of different WiFi networks,
and each time it connects it gets a different internal IP address from that
particular router. The same is true in your home network, so when
your laptop connects to your router, it might get a dynamic internal IP
address like 192.168.1.100. But if it disconnects from the network
and then later reconnects, it might get 192.168.1.101. If
you setup your router to forward data to the laptop's internal IP address
and that IP address changes, the port forwarding won't work anymore.
For that reason, it's easier if you use a static IP address on the PC running
FSHost so it doesn't change. But if that PC is a laptop, remember to set it back to dynamic
before you connect to some other WiFi network (like at a cafe) since other WiFi
networks won't accept the static IP you set.
If you have to use a dynamic internal IP on the FSHost PC, just be sure
to update the router's port forwarding with the PC's latest IP address each
time you connect to the network.
You can find a PC's internal IP
by running the Windows built-in program "Command Prompt", and then typing "ipconfig".
Then look for a line that shows the "IP Address" or "IPv4 Address".
To setup your PC to use a static internal IP address:
-
Get your router's internal IP address by running the Windows built-in program "Command Prompt", and then typing "ipconfig".
The router's IP address will be listed as the "Default Gateway". See the image above.
- In Windows 10:
- Go to Start / Settings / Network & Internet.
- On the Status page, it should say, "You're connected to the Internet".
Just below that, click either the "Properties" button or the blue link "Change connection properties".
Either way, you should end up on a page that says, "Network profile" near the top.
- Scroll down a bit and you'll see "IP settings". Click the Edit button there to open a
popup window that says, "Edit IP settings".
- Change the first drop-down menu to "Manual" for a static IP. (If you need to change it back to dynamic addressing later,
set this same drop-down menu to "Automatic (DHCP)".)
- Set the "IPv4" switch to "On".
- For the "IP address", enter the static IP you want to use for this PC. It must be at least one
greater than the router's IP address, and it must not be the same as
any other computer on your local network. So for example, if your
router's IP address is 192.168.1.1, you might set your PC's address
to 192.168.1.2 or 192.168.1.3. Routers are usually configured
to reserve addresses above 100 (as the last number in the IP) for dynamic
IPs, so the range from 2 to 99 is usually ok to use for static IPs.
The first three sets of numbers (192.168.1, in this example) must always be the same as the router's IP.
- For the "Subnet prefix length", enter "24".
- For the "Gateway", enter your router's IP address found above. Enter the router's IP address again for the "Preferred
DNS" and leave the "Alternate DNS" blank.
- Leave the "IPv6" switch turned off.
- Click Save.
- In Windows XP, Vista, and Windows 7:
- Go to Start / Control Panel.
- In WIndows XP, click "Network and Internet Connections" and then
"Network connections".
- In Vista and Windows 7, click "Network and Internet" and then "Network
and Sharing Center". In Vista, then click "Manage network connections".
In Windows 7, click "Change adapter settings".
- Right click your internet connection. Yours might be called
"Local Area Connection" or "Wireless Network Connection". From
the drop-down list, select "Properties".
- In XP, select "Internet Protocol TCP/IP" and then click Properties.
- In Vista and Windows 7, select "Internet Protocol Version 4 (TCP/IPv4)"
and then click Properties.
- Select "Use the following IP address" for a static IP. (If you need to change it back to dynamic addressing later,
set this to "Obtain an IP address automatically.)
- Enter the static IP address
you want to use on this PC. The IP address must be at least one
greater than the router's IP address, and it must not be the same as
any other computer on your local network. So for example, if your
router's IP address is 192.168.1.1, you might set your PC's address
to 192.168.1.2 or 192.168.1.3. Routers are usually configured
to reserve addresses above 100 (as the last number in the IP) for dynamic
IPs, so the range from 2 to 99 is usually ok to use for static IPs.
- The "Subnet mask" is usually filled in automatically, but if not,
set it to 255.255.255.0
- For the "Default gateway", enter your router's IP address found
above. Enter the router's IP address again for the "Preferred
DNS server" and leave the "Alternate DNS server" blank.
- Click OK twice to save.
Using multiple PCs on your local network:
Things are a lot easier if you run FSHost and Flight Simulator on the
same PC, instead of using multiple PCs on your local network. This
is because when you forward ports in the router, you can only forward them
to one PC at a time, and that PC should be the one running FSHost.
When Flight Simulator connects to a session, it connects directly to
every other player in the session as well -- the data is not relayed by
FSHost. If you were to run FSHost and Flight Simulator on different
PCs in your local network, then someone connecting to FSHost from out on
the internet will also try to connect to your Flight Simulator PC but they
won't be able to, because the router ports are only forwarded to the FSHost
PC.
That being said, if you want to host a session where everyone in the
session is connecting in from your local network only, and nobody's connecting
from out on the internet, that should work fine, and you only need to configure
the firewall on each PC -- you can skip the port forwarding in the router.
But if you're determined to run FSHost and Flight Simulator on different
PCs on your local network, and you want to allow incoming connections from
the internet as well, then you might try PuffinSoft's
DXport program.
It was designed to solve this exact problem by splitting up the DirectX
ports so that each PC on your local network uses only a few of them at a
time, and then you can tell the router which ones to forward to each PC.
So for example, instead of forwarding the entire range of UDP ports 2300
to 2400 all to the FSHost machine, you'd forward just the first few to the
FSHost machine, then forward the next few to the Flight Simulator machine,
etc. The DXport program then allows you to tell FSHost and Flight
Simulator which ports to use on that particular PC.
But trust me -- just run everything on the same machine and things will
be easier. ;-)
Good
Ok
Bad
Terrible